
วันจันทร์ที่ 22 พฤษภาคม พ.ศ. 2560
ว่าด้วย Database (In Recovery) sql server
สำหรับฐานข้อมูลบ้านๆ ไม่มีคลัสตงคลัสเตอร์ใดๆทั้งสิ้น ตามหัวข้อเลยครับเวลา restart server หรือ restart SQL Service บางที่ Database มันไม่พร้อมใช้งานขึ้นว่า (In Recovery) ปวดหัวสิครับ user โทรตามยิกๆ เมื่อไรจะเสร็จๆ บางคนรอไม่ไหว restore ย้อนหลังที่ backup ไว้ แต่เดี๋ยวก่อนบางครั้งดูปัญหาที่เจอและเช็คก่อนทำอย่างอื่นได้ครับ วันนี้เสนอ sp_readerrorlog รันมันดื้อๆ บน MasterDBไปเลย จะเจอความก้าวหน้าของการ Recovery ซึ่งมีหน่วยประมาณการเป็น วินาทีด้วย ไปลองดูกันครับ

วันพฤหัสบดีที่ 18 มิถุนายน พ.ศ. 2558
enable icon printer Crystall Report 8.5
สำหรับท่านที่ประสบปัญหาแก้ report ชาวบ้านแล้วไอคอนเครื่องพิมพ์ใช้งานไม่ได้
ให้ท่าทำการติดตั้งครั้งพิพม์สักเครื่องลงที่เครื่องที่จะแก้ report แล้วตอนแก้เสร็จก็ให้มัน default ตามเครื่องคอม
แค่นี้ก็เป็นอันใช้งานได้แล้ว
วันอังคารที่ 25 มิถุนายน พ.ศ. 2556
Last Rows Version Or Last Timestamp SQL Server
การหา rows version ล่าสุดของ database ที่มีข้อมูล rowsversion หรือ timestamp
SELECT @@DBTS
ถ้าเป็นฐาน 16 ก็แปลงเป็นฐาน 10 จะได้ดูเข้าใจ
Select Convert(bigint,@@DBTS)
วันพุธที่ 13 มีนาคม พ.ศ. 2556
ว่าด้วยการเรียกใช้ Webservice ด้วย javascript
ไม่ได้เขียนบล๊อกซะนานกลับมาอีกทีก็หลายปีผ่านพ้น วันนี้จะมาทำหน่วยความจำเล็กๆ ไว้ดูเวลาลืมหรือถ้าใครที่ผ่านมาเจอเห็นว่ามีประโยชน์ก็ดีใจด้วย
กล่าวว่า javascript มันจะติดต่อกับ database ได้อย่างไรจนได้มาพบรูปแบบคือการเรียกผ่าน webserive นั่นเอง แต่ไฉนจะเรียก service ได้มันก็ต้องมีแนวทาง
กล่าวว่า javascript มันจะติดต่อกับ database ได้อย่างไรจนได้มาพบรูปแบบคือการเรียกผ่าน webserive นั่นเอง แต่ไฉนจะเรียก service ได้มันก็ต้องมีแนวทาง
วันศุกร์ที่ 18 พฤษภาคม พ.ศ. 2555
การ stop port serial และหยุด Thread ไม่ให้โปรแกรมค้าง
การ stop port serial และหยุด Thread ไม่ให้โปรแกรมค้าง ไปลอกเขามาอีกทีแต่จำเวปไม่ได้แล้ว
private void Form1_FormClosing(object sender, FormClosingEventArgs e)
{
if (serialPort1.IsOpen)
{
e.Cancel = true; //cancel the fom closing
Thread CloseDown = new Thread(new ThreadStart(CloseSerialOnExit)); //close port in new thread to avoid hang
CloseDown.Start();
}
}
private void CloseSerialOnExit()
{
try
{
serialPort1.Close(); //close the serial port
}
catch (Exception ex)
{
MessageBox.Show(ex.Message); //catch any serial port closing error messages
}
this.Invoke(new EventHandler(NowClose)); //now close back in the main thread
}
private void NowClose(object sender, EventArgs e)
{
this.Close(); //now close the form
}
private void Form1_FormClosing(object sender, FormClosingEventArgs e)
{
if (serialPort1.IsOpen)
{
e.Cancel = true; //cancel the fom closing
Thread CloseDown = new Thread(new ThreadStart(CloseSerialOnExit)); //close port in new thread to avoid hang
CloseDown.Start();
}
}
private void CloseSerialOnExit()
{
try
{
serialPort1.Close(); //close the serial port
}
catch (Exception ex)
{
MessageBox.Show(ex.Message); //catch any serial port closing error messages
}
this.Invoke(new EventHandler(NowClose)); //now close back in the main thread
}
private void NowClose(object sender, EventArgs e)
{
this.Close(); //now close the form
}
วันศุกร์ที่ 6 เมษายน พ.ศ. 2555
แก้ เข้า device and printer windows 7 ไม่ได้
1.อาจเป็นเพราะอุปกรณ์บางตัวมีปัญหา ลองถอดออกดูแล้ว restart ใหม่
2.ไป stop service->Printer Spooler ดู แล้วเข้าใหม่สังเกตุอุปกรณ์ที่มีปัญหาแล้วถอดมันออกซะ
อย่าลืม start service คืนด้วยนะ
อีกวิธีไปเจอในเว็บเลยเอามาฝาก
Make sure that all printers are unplugged from your PC during this
time:
Click Start,
type "Services.msc" (without the quotation marks) in the Search box and
press Enter.
Double-click
"Printer Spooler" in the Services list.
Click Stop
and click OK.
Click Start,
type "%WINDIR%\system32\spool\printers" in the Start Search box and press
Enter, delete all files in this folder.
Click Start,
type "Services.msc" (without the quotation marks) in the Start Search box
and press Enter.
Double-click
"Printer Spooler" in the Services list.
Click on
Start. In the Startup Type list, make sure that "Automatic" is
selected and click OK. After that, head to the
Control Panel. Go to Administrative Tools. Go to Print
Management.
Expand Print Servers
Expand your PC
Click on Drivers
Delete anything related to an actual driver for this printer
Click on Printers
Delete the Printer if it is listed. If you receive errors trying
to remove it, let me know and we will need to do more.If not, reboot
your PC and attempt to open Devices and Printers again.
2.ไป stop service->Printer Spooler ดู แล้วเข้าใหม่สังเกตุอุปกรณ์ที่มีปัญหาแล้วถอดมันออกซะ
อย่าลืม start service คืนด้วยนะ
อีกวิธีไปเจอในเว็บเลยเอามาฝาก
Make sure that all printers are unplugged from your PC during this
time:
Click Start,
type "Services.msc" (without the quotation marks) in the Search box and
press Enter.
Double-click
"Printer Spooler" in the Services list.
Click Stop
and click OK.
Click Start,
type "%WINDIR%\system32\spool\printers" in the Start Search box and press
Enter, delete all files in this folder.
Click Start,
type "Services.msc" (without the quotation marks) in the Start Search box
and press Enter.
Double-click
"Printer Spooler" in the Services list.
Click on
Start. In the Startup Type list, make sure that "Automatic" is
selected and click OK. After that, head to the
Control Panel. Go to Administrative Tools. Go to Print
Management.
Expand Print Servers
Expand your PC
Click on Drivers
Delete anything related to an actual driver for this printer
Click on Printers
Delete the Printer if it is listed. If you receive errors trying
to remove it, let me know and we will need to do more.If not, reboot
your PC and attempt to open Devices and Printers again.
วันอาทิตย์ที่ 27 กุมภาพันธ์ พ.ศ. 2554
Compress file by Dos Command
Compress by 7-Zip
add path Environment -> C:\Program Files\7-Zip
dos command
1.select Source Folder
cd \
cd "SourceFolder"
2. run compress
7z a file.7z *.*
3.copy file to Destination
copy file.7z d:\DestinationFolder\"file_%date:/=-%".7z
4.Delete file from Source Folder
echo Ydel *.*
----------------------------------------------------------------------------------
Compress by Winrar
add path Environment -> C:\Program Files\winrar
dos command
1.select Source Folder
cd \
cd "SourceFolder"
2. run compress
Winrar a file.rar *.*
3.copy file to Destination
copy file.rar d:\DestinationFolder\"file_%date:/=-%".rar
4.Delete file from Source Folder
echo Ydel *.*
add path Environment -> C:\Program Files\7-Zip
dos command
1.select Source Folder
cd \
cd "SourceFolder"
2. run compress
7z a file.7z *.*
3.copy file to Destination
copy file.7z d:\DestinationFolder\"file_%date:/=-%".7z
4.Delete file from Source Folder
echo Ydel *.*
----------------------------------------------------------------------------------
Compress by Winrar
add path Environment -> C:\Program Files\winrar
dos command
1.select Source Folder
cd \
cd "SourceFolder"
2. run compress
Winrar a file.rar *.*
3.copy file to Destination
copy file.rar d:\DestinationFolder\"file_%date:/=-%".rar
4.Delete file from Source Folder
echo Ydel *.*
วันจันทร์ที่ 21 กุมภาพันธ์ พ.ศ. 2554
รวมคำสั่ง Run สำหรับ windows
จะสั่งผ่าน run หรือผ่าน command dos ก็ประยุคใช้กันนะครับ
เรียกโปรแกรม Accessibility Options —> access.cpl
เรียกโปรแกรม Add Hardware —> hdwwiz.cpl
เรียกโปรแกรม Add/Remove Programs —> appwiz.cpl
เรียกโปรแกรม Administrative Tools control —> admintools
ตั้งค่า Automatic Updates —> wuaucpl.cpl
เรียกโปรแกรม Bluetooth Transfer Wizard —> fsquirt
เรียกโปรแกรม เครื่องคิดเลข (Calculator) —> calc
เรียกโปรแกรม Certificate Manager —> certmgr.msc
เรียกโปรแกรม Character Map —> charmap
เรียกโปรแกรม ตรวจสอบดิสก์ (Check Disk Utility) —> chkdsk
เรียกดูคลิปบอร์ด (Clipboard Viewer) —> clipbrd
เรียกหน้าต่างดอส (Command Prompt) —> cmd
เรียกโปรแกรม Component Services —> dcomcnfg
เรียกโปรแกรม Computer Management —> compmgmt.msc
เรียกดู/ตั้ง เวลาและวันที่ —> timedate.cpl
เรียกหน้าต่าง Device Manager —> devmgmt.msc
เรียกดูข้อมูล Direct X (Direct X Troubleshooter) —> dxdiag
เรียกโปรแกรม Disk Cleanup Utility —> cleanmgr
เรียกโปรแกรม Disk Defragment —> dfrg.msc
เรียกโปรแกรม Disk Management —> diskmgmt.msc
เรียกโปรแกรม Disk Partition Manager —> diskpart
เรียกหน้าต่าง Display Properties control desktop —> desk.cpl
เรียกหน้าต่าง Display Properties เพื่อปรับสีวินโดวส์ —> control color
เรียกดูโปรแกรมช่วยแก้ไขปัญหา (Dr. Watson) —> drwtsn32
เรียกโปรแกรมตรวจสอบไดร์ฟเวอร์ (Driver Verifier Utility) —> verifier
เรียกดูประวัติการทำงานของเครื่อง (Event Viewer) —> eventvwr.msc
เรียกเครื่องมือตรวจสอบไฟล์ File Signature Verification Tool —> sigverif
เรียกหน้าต่าง Folders Options control —> folders
เรียกโปรแกรมจัดการ Fonts —> control fonts
เปิดไปยังโฟลเดอร์ Fonts (Fonts Folder) —> fonts
เรียกเกม Free Cell —> freecell
เปิดหน้าต่าง Game Controllers —> joy.cpl
เปิดโปรแกรมแก้ไข Group Policy (ใช้กับ XP Home ไม่ได้) —> gpedit.msc
เรียกโปรแกรมสร้างไฟล์ Setup (Iexpress Wizard) —> iexpress
เรียกโปรแกรม Indexing Service —> ciadv.msc
เรียกหน้าต่าง Internet Properties —> inetcpl.cpl
เรียกหน้าต่าง Keyboard Properties —> control keyboard
แก้ไขค่าความปลอดภัย (Local Security Settings) —> secpol.msc
แก้ไขผู้ใช้ (Local Users and Groups) —> lusrmgr.msc
คำสั่ง Log-off —> logoff
เรียกหน้าต่าง Mouse Properties control mouse main.cpl
เรียกหน้าต่าง Network Connections control netconnections —> ncpa.cpl
เรียกหน้าต่าง Network Setup Wizard —> netsetup.cpl
เรียกโปรแกรม Notepad —> notepad
เรียกคีย์บอร์ดบนหน้าจอ (On Screen Keyboard) —> osk
เรียกหน้าต่าง Performance Monitor —> perfmon.msc
เรียกหน้าต่าง Power Options Properties —> powercfg.cpl
เรียกโปรแกรม Private Character Editor —> eudcedit
เรียกหน้าต่าง Regional Settings —> intl.cpl
เรียกหน้าต่าง Registry Editor —> regedit
เรียกโปรแกรม Remote Desktop —> mstsc
เรียกหน้าต่าง Removable Storage —> ntmsmgr.msc
เรียกหน้าต่าง Removable Storage Operator Requests —> ntmsoprq.msc
เรียกดู Policy ที่ตั้งไว้ (ใช้กับ XP Home ไม่ได้) —> rsop.msc
เรียกหน้าต่าง Scanners and Cameras —> sticpl.cpl
เรียกโปรแกรม Scheduled Tasks control —> schedtasks
เรียกหน้าต่าง Security Center —> wscui.cpl
เรียกหน้าต่าง Services —> services.msc
เรียกหน้าต่าง Shared Folders —> fsmgmt.msc
คำสั่ง Shuts Down —> shutdown
เรียกหน้าต่าง Sounds and Audio —> mmsys.cpl
เรียกเกม Spider Solitare —> spider
แก้ไขไฟล์ระบบ (System Configuration Editor) —> sysedit
แก้ไขการตั้งค่าระบบ (System Configuration Utility) —> msconfig
ตรวจสอบระบบด้วย System File Checker Utility (เริ่มทันที) —> sfc /scannow
ตรวจสอบระบบด้วย System File Checker Utility (เริ่มเมื่อบู๊ต) —> sfc /scanonce
เรียกหน้าต่าง System Properties —> sysdm.cpl
เรียกหน้าต่าง Task Manager —> taskmgr
เรียกหน้าต่าง User Account Management —> nusrmgr.cpl
เรียกโปรแกรม Utility Manager —> utilman
เรียกโปรแกรม Windows Firewall —> firewall.cpl
เรียกโปรแกรม Windows Magnifier —> magnify
เรียกหน้าต่าง Windows Management Infrastructure —> wmimgmt.msc
เรียกหน้าต่าง Windows System Security Tool —> syskey
เรียกตัวอัพเดตวินโดวส์ (Windows Update) —> wupdmgr
เรียกโปรแกรม Wordpad —> write
เรียกโปรแกรม Accessibility Options —> access.cpl
เรียกโปรแกรม Add Hardware —> hdwwiz.cpl
เรียกโปรแกรม Add/Remove Programs —> appwiz.cpl
เรียกโปรแกรม Administrative Tools control —> admintools
ตั้งค่า Automatic Updates —> wuaucpl.cpl
เรียกโปรแกรม Bluetooth Transfer Wizard —> fsquirt
เรียกโปรแกรม เครื่องคิดเลข (Calculator) —> calc
เรียกโปรแกรม Certificate Manager —> certmgr.msc
เรียกโปรแกรม Character Map —> charmap
เรียกโปรแกรม ตรวจสอบดิสก์ (Check Disk Utility) —> chkdsk
เรียกดูคลิปบอร์ด (Clipboard Viewer) —> clipbrd
เรียกหน้าต่างดอส (Command Prompt) —> cmd
เรียกโปรแกรม Component Services —> dcomcnfg
เรียกโปรแกรม Computer Management —> compmgmt.msc
เรียกดู/ตั้ง เวลาและวันที่ —> timedate.cpl
เรียกหน้าต่าง Device Manager —> devmgmt.msc
เรียกดูข้อมูล Direct X (Direct X Troubleshooter) —> dxdiag
เรียกโปรแกรม Disk Cleanup Utility —> cleanmgr
เรียกโปรแกรม Disk Defragment —> dfrg.msc
เรียกโปรแกรม Disk Management —> diskmgmt.msc
เรียกโปรแกรม Disk Partition Manager —> diskpart
เรียกหน้าต่าง Display Properties control desktop —> desk.cpl
เรียกหน้าต่าง Display Properties เพื่อปรับสีวินโดวส์ —> control color
เรียกดูโปรแกรมช่วยแก้ไขปัญหา (Dr. Watson) —> drwtsn32
เรียกโปรแกรมตรวจสอบไดร์ฟเวอร์ (Driver Verifier Utility) —> verifier
เรียกดูประวัติการทำงานของเครื่อง (Event Viewer) —> eventvwr.msc
เรียกเครื่องมือตรวจสอบไฟล์ File Signature Verification Tool —> sigverif
เรียกหน้าต่าง Folders Options control —> folders
เรียกโปรแกรมจัดการ Fonts —> control fonts
เปิดไปยังโฟลเดอร์ Fonts (Fonts Folder) —> fonts
เรียกเกม Free Cell —> freecell
เปิดหน้าต่าง Game Controllers —> joy.cpl
เปิดโปรแกรมแก้ไข Group Policy (ใช้กับ XP Home ไม่ได้) —> gpedit.msc
เรียกโปรแกรมสร้างไฟล์ Setup (Iexpress Wizard) —> iexpress
เรียกโปรแกรม Indexing Service —> ciadv.msc
เรียกหน้าต่าง Internet Properties —> inetcpl.cpl
เรียกหน้าต่าง Keyboard Properties —> control keyboard
แก้ไขค่าความปลอดภัย (Local Security Settings) —> secpol.msc
แก้ไขผู้ใช้ (Local Users and Groups) —> lusrmgr.msc
คำสั่ง Log-off —> logoff
เรียกหน้าต่าง Mouse Properties control mouse main.cpl
เรียกหน้าต่าง Network Connections control netconnections —> ncpa.cpl
เรียกหน้าต่าง Network Setup Wizard —> netsetup.cpl
เรียกโปรแกรม Notepad —> notepad
เรียกคีย์บอร์ดบนหน้าจอ (On Screen Keyboard) —> osk
เรียกหน้าต่าง Performance Monitor —> perfmon.msc
เรียกหน้าต่าง Power Options Properties —> powercfg.cpl
เรียกโปรแกรม Private Character Editor —> eudcedit
เรียกหน้าต่าง Regional Settings —> intl.cpl
เรียกหน้าต่าง Registry Editor —> regedit
เรียกโปรแกรม Remote Desktop —> mstsc
เรียกหน้าต่าง Removable Storage —> ntmsmgr.msc
เรียกหน้าต่าง Removable Storage Operator Requests —> ntmsoprq.msc
เรียกดู Policy ที่ตั้งไว้ (ใช้กับ XP Home ไม่ได้) —> rsop.msc
เรียกหน้าต่าง Scanners and Cameras —> sticpl.cpl
เรียกโปรแกรม Scheduled Tasks control —> schedtasks
เรียกหน้าต่าง Security Center —> wscui.cpl
เรียกหน้าต่าง Services —> services.msc
เรียกหน้าต่าง Shared Folders —> fsmgmt.msc
คำสั่ง Shuts Down —> shutdown
เรียกหน้าต่าง Sounds and Audio —> mmsys.cpl
เรียกเกม Spider Solitare —> spider
แก้ไขไฟล์ระบบ (System Configuration Editor) —> sysedit
แก้ไขการตั้งค่าระบบ (System Configuration Utility) —> msconfig
ตรวจสอบระบบด้วย System File Checker Utility (เริ่มทันที) —> sfc /scannow
ตรวจสอบระบบด้วย System File Checker Utility (เริ่มเมื่อบู๊ต) —> sfc /scanonce
เรียกหน้าต่าง System Properties —> sysdm.cpl
เรียกหน้าต่าง Task Manager —> taskmgr
เรียกหน้าต่าง User Account Management —> nusrmgr.cpl
เรียกโปรแกรม Utility Manager —> utilman
เรียกโปรแกรม Windows Firewall —> firewall.cpl
เรียกโปรแกรม Windows Magnifier —> magnify
เรียกหน้าต่าง Windows Management Infrastructure —> wmimgmt.msc
เรียกหน้าต่าง Windows System Security Tool —> syskey
เรียกตัวอัพเดตวินโดวส์ (Windows Update) —> wupdmgr
เรียกโปรแกรม Wordpad —> write
วันพฤหัสบดีที่ 17 กุมภาพันธ์ พ.ศ. 2554
VPN Connect/Disconnect by dos command
After created your VPN Connection Name by windows os network tool
run command
connect -->rasdial "VPN name" vpn_user vpn_password
disconnect -->rasdial "VPN name" /d
run command
connect -->rasdial "VPN name" vpn_user vpn_password
disconnect -->rasdial "VPN name" /d
open website by dos command
run dos command
explorer your website
example:
explorer http://www.google.com
explorer your website
example:
explorer http://www.google.com
วันพฤหัสบดีที่ 16 ธันวาคม พ.ศ. 2553
outlook can not open file on browser
1. Click Start > Run and type regedit.
2. Click Edit > Find and type OutlookSecureTempFolder.
3. When regedit has found the entry, it will tell you where your Outlook temporary files are stored. It will look similar to:
C:\Documents and Settings\username\Local Settings\Temporary Internet Files\OLKrandomnumber
4. Open My Computer and navigate to this location on your hard drive.
5. Delete all of the files in this folder.
6. Restart Microsoft Outlook and you should be able to open your attachment.
2. Click Edit > Find and type OutlookSecureTempFolder.
3. When regedit has found the entry, it will tell you where your Outlook temporary files are stored. It will look similar to:
C:\Documents and Settings\username\Local Settings\Temporary Internet Files\OLKrandomnumber
4. Open My Computer and navigate to this location on your hard drive.
5. Delete all of the files in this folder.
6. Restart Microsoft Outlook and you should be able to open your attachment.
SQL Command ที่น่าลองดู
sql select แยกอักษร เล็ก ใหญ่ ไม่รู้จักกัน
จะ select เฉพาะที่ขึ้นต้นด้วย ตัว B ใหญ่ ซึ่ง b เล็กจะไม่มาด้วย
ดูว่ามีใคร connect database เราอยู่บ้าง
exec sp_who หรือ exec sp_who2
จะ select เฉพาะที่ขึ้นต้นด้วย ตัว B ใหญ่ ซึ่ง b เล็กจะไม่มาด้วย
SELECT *
FROM tbvendor where 'B'=substring(ltrim(vendorid),1,1) collate Latin1_General_Bin
ดูว่ามีใคร connect database เราอยู่บ้าง
exec sp_who หรือ exec sp_who2
phpMyAdmin Error on php5 iis6
Cannot load mcrypt extension. Please check your PHP configuration.
edit C:\WINDOWS\php.ini
change ;extension=php_mcrypt.dll to extension=php_mcrypt.dll
edit C:\WINDOWS\php.ini
change ;extension=php_mcrypt.dll to extension=php_mcrypt.dll
set iis6 run php5 for website
After setup iis6 and php5
1.create website .
2.right click on that site and select Properties.
3.On tab ISAPI filters click Add.
4.On popup type Filter name:PHP.
5.Browse.. select c:/php5/php5isapi.dll for Excutable and OK.
6.On tab Home Directoryclick button Browse and select your Web path.
7.Click button Configuration.
8.On popup tab Mappings check true for ISAPI extensions.
9.click button Add Browse.. select c:/php5/php5isapi.dll for Excutable.
10. input Extensions: .php and Ok.
1.create website .
2.right click on that site and select Properties.
3.On tab ISAPI filters click Add.
4.On popup type Filter name:PHP.
5.Browse.. select c:/php5/php5isapi.dll for Excutable and OK.
6.On tab Home Directoryclick button Browse and select your Web path.
7.Click button Configuration.
8.On popup tab Mappings check true for ISAPI extensions.
9.click button Add Browse.. select c:/php5/php5isapi.dll for Excutable.
10. input Extensions: .php and Ok.
การใช้ confirm box ใน web ด้วย c#
หลายท่านอาจเคยประสบปัญหาเวลาเขียน software Aplication เราจะใช้พวก box ต่าง ๆ ได้ง่าย ๆ เพราะส่วนมากจะเป็น component ที่พร้อมใช้ได้เลยเช่น Messagebox งง 555
เอาเป็นว่ามาพูดถึงการเขียน web กันเลยดีกว่า
ถ้าเราจะ click ปุ่มเพื่อให้ไปทำอะไรสักอย่างอะคับแต่เราจะทำ confirm box ก่อนที่จะไปทำจริง ๆ (confirm box ก็คือประมาณว่า ตกลงจะทำใช่หรือไม่แล้วให้เลือก yes ทำ หรือ no ก็ไม่ทำ)
ใช้คำสั่งนี้เลยคับเอาไว้ใน Page_Load ละ
controlid.Attributes.Add("onclick", "return confirm('คุณมั่นใจแล้วว่าจะลบ Record นี้?');");
เอาเป็นว่ามาพูดถึงการเขียน web กันเลยดีกว่า
ถ้าเราจะ click ปุ่มเพื่อให้ไปทำอะไรสักอย่างอะคับแต่เราจะทำ confirm box ก่อนที่จะไปทำจริง ๆ (confirm box ก็คือประมาณว่า ตกลงจะทำใช่หรือไม่แล้วให้เลือก yes ทำ หรือ no ก็ไม่ทำ)
ใช้คำสั่งนี้เลยคับเอาไว้ใน Page_Load ละ
controlid.Attributes.Add("onclick", "return confirm('คุณมั่นใจแล้วว่าจะลบ Record นี้?');");
remove 'Welcome to the Frontpage' title in Joomla! 1.5
Navigation
Previous • Table of Contents • Next
If you install new Joomla! 1.5 on your server, you get the 'Welcome to the Frontpage' title on your Frontpage. Sometimes, it is difficult to find, where you can change this title.
Go to your Joomla! 1.5 Administration site and login. In your administration site go to:
แก้ที่ back office นะคับ
* Menus - Main Menu (now you are in: Menu Item Manager: mainmenu).
(ไปที่เลือกที่ main menu)
* Click on 'Home' link to edit this link (you are now in: Menu Item: Edit).
(เลือก home)
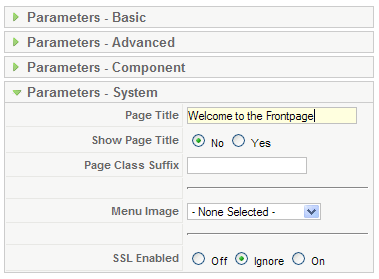
* Click on Parameters System and change or delete the Page title.
(เลือก Parameters System ที่ด้านขวามือตามรูป แล้วก็แก้ไขตามต้องการเลยจ้า )
o If you change the Page title, changed title will be displayed on your Frontpage as a title.
o If you delete the Page title, Menu link will be displayed on your Frontpage as a title (in the present case 'Home' will be displayed as title, because 'Home' is the name of the link to the Frontpage).
o If you don't want to display any title, set Show Page Title below Page title parameter to 'No'.
* Don't forget to save changes.
ปล. อย่าลืม save นะจะ
ที่มา http://www.phoca.cz/documents/16-joomla/167-welcome-to-the-frontpage-remove
วันเสาร์ที่ 5 มิถุนายน พ.ศ. 2553
การวางแผนทรัพยากรทางธุรกิจขององค์กรโดยรวม ERP
Erp ย่อมาจาก Enterprise Resource Planning ถ้าแปลตรงตัวคือ การวางแผนทรัพยากร
ทางธุรกิจขององค์กรโดยรวม หรืออีกนัยหนึ่งก็คือ การบริหารเพื่อให้เกิดการใช้ประโยชน์อย่างสุงสุด
ของทรัพยากรทางธุรกิจขององค์กร ระบบ ERP เป็นระบบสารสนเทศ ที่องค์กรสามารถนำแนวคิดและวิธีการ
บริหารของ ERPมาทำให้เกิดเป็นระบบเชิงปฏิบัติในองค์กร กล่าวคือ ระบบ ERP เป็นระบบสารสนเทศ
ในองค์กรที่สามารถบูรณาการ (Integrate) รวมงานลัก (Core Bussiness Process) ต่าง ๆ
ในบริษัททั้งหมด ได้แก่ การจัดซื้อจัดจ้าง การผลิต การขาย การบัญชี และการบริหารบุคคลเข้าด้วยกันเป็น
ระบบที่สัมพันธ์กันและสามารถเชื่อมโยง ณ เวลานั้นทันที (Real Time)
บทบาทของ ERP คืออะไร
สภาพธุรกิจที่มีขนาดใหญ่และมีการขยายตัวอย่างต่อเนื่อง เป็นผลทำให้เกิดการเชื่อมโยงของกิจกรรม
สร้างมูลค่าให้กับลูกค้า ของแผนกต่างๆที่เกี่ยวข้อง ยาวและซับซ้อนขึ้น และเมื่อความเชื่อมโยงของกิจกรรม
ต่างๆขยายใหญ่และซับซ้อนขึ้น ถ้าไม่มีระบบข้อมูลในการจัดการที่ดี โอกาสที่จะเกิดปัญหาในการ
รับรู้สภาพการเชื่อมโยงของกิจกรรมย่อมทำได้ยาก และผลที่ตามมาคือ ข้อมูลมากแต่ไม่รู้ว่าข้อมูลอันไหน
ที่เป็นประโยชน์ในการตัดสินใจที่จะลงทุนและบริหารทรัพยากรให้มีประสิทธิภาพได้ ดังนั้น ERP ก็คือ
เครื่องมือที่นำมาใช้ในการบริหารธุรกิจเพื่อแก้ปัญหาต่างๆ ในเชิงบริหารที่เกิดขึ้นดังกล่าวอีกทั้งจะช่วยให้
้สามารถวางแผนการลงทุนและบริหารทรัพยากรขององค์กรโดยรวมได้อย่างมีประสิทธิภาพ ดังรูปต่อไปนี้
ประโยชน์ในการนำ ERP มาใช้
- เกิดการปฏิรูปการทำงาน
- การเพิ่มประสิทธิภาพและความเหมาะสมให้กับกระบวนการทางธุรกิจ
- การทำให้การบริหารงานได้รวดเร็ว ไวต่อเหตุการณ์
- การลดลงของค่าใช้จ่ายโดยรวมขององค์กร
- เกิดการปฏิรูปการบริหารธุรกิจ
- ความสามารถในการรับรู้สภาพการณ์โดยรวมของการบริหารได้แบบเรียลไทม์
- ความสามารถในการปรับเปลี่ยนเพื่อให้องค์กรโดยรวมมีประสิทธิภาพสูงสุด
- ความสามารถในการตัดสินใจได้รวดเร็วทันต่อเหตุการณ์
- เกิดการปฏิรูปวัฒนธรรมและวิถีขององค์กร
- การเป็นตัวเองและความกระตือรือร้นของพนักงาน
- การใช้ความสามารถของพนักงานให้เกิดผลสำเร็จ
- การใช้ความคิดสร้างสรรค์ของพนักงานในการบริหารองค์กรให้เกิดผลสำเร็จ
ที่มา : www.td-star.com
ทางธุรกิจขององค์กรโดยรวม หรืออีกนัยหนึ่งก็คือ การบริหารเพื่อให้เกิดการใช้ประโยชน์อย่างสุงสุด
ของทรัพยากรทางธุรกิจขององค์กร ระบบ ERP เป็นระบบสารสนเทศ ที่องค์กรสามารถนำแนวคิดและวิธีการ
บริหารของ ERPมาทำให้เกิดเป็นระบบเชิงปฏิบัติในองค์กร กล่าวคือ ระบบ ERP เป็นระบบสารสนเทศ
ในองค์กรที่สามารถบูรณาการ (Integrate) รวมงานลัก (Core Bussiness Process) ต่าง ๆ
ในบริษัททั้งหมด ได้แก่ การจัดซื้อจัดจ้าง การผลิต การขาย การบัญชี และการบริหารบุคคลเข้าด้วยกันเป็น
ระบบที่สัมพันธ์กันและสามารถเชื่อมโยง ณ เวลานั้นทันที (Real Time)
บทบาทของ ERP คืออะไร
สภาพธุรกิจที่มีขนาดใหญ่และมีการขยายตัวอย่างต่อเนื่อง เป็นผลทำให้เกิดการเชื่อมโยงของกิจกรรม
สร้างมูลค่าให้กับลูกค้า ของแผนกต่างๆที่เกี่ยวข้อง ยาวและซับซ้อนขึ้น และเมื่อความเชื่อมโยงของกิจกรรม
ต่างๆขยายใหญ่และซับซ้อนขึ้น ถ้าไม่มีระบบข้อมูลในการจัดการที่ดี โอกาสที่จะเกิดปัญหาในการ
รับรู้สภาพการเชื่อมโยงของกิจกรรมย่อมทำได้ยาก และผลที่ตามมาคือ ข้อมูลมากแต่ไม่รู้ว่าข้อมูลอันไหน
ที่เป็นประโยชน์ในการตัดสินใจที่จะลงทุนและบริหารทรัพยากรให้มีประสิทธิภาพได้ ดังนั้น ERP ก็คือ
เครื่องมือที่นำมาใช้ในการบริหารธุรกิจเพื่อแก้ปัญหาต่างๆ ในเชิงบริหารที่เกิดขึ้นดังกล่าวอีกทั้งจะช่วยให้
้สามารถวางแผนการลงทุนและบริหารทรัพยากรขององค์กรโดยรวมได้อย่างมีประสิทธิภาพ ดังรูปต่อไปนี้
ประโยชน์ในการนำ ERP มาใช้
- เกิดการปฏิรูปการทำงาน
- การเพิ่มประสิทธิภาพและความเหมาะสมให้กับกระบวนการทางธุรกิจ
- การทำให้การบริหารงานได้รวดเร็ว ไวต่อเหตุการณ์
- การลดลงของค่าใช้จ่ายโดยรวมขององค์กร
- เกิดการปฏิรูปการบริหารธุรกิจ
- ความสามารถในการรับรู้สภาพการณ์โดยรวมของการบริหารได้แบบเรียลไทม์
- ความสามารถในการปรับเปลี่ยนเพื่อให้องค์กรโดยรวมมีประสิทธิภาพสูงสุด
- ความสามารถในการตัดสินใจได้รวดเร็วทันต่อเหตุการณ์
- เกิดการปฏิรูปวัฒนธรรมและวิถีขององค์กร
- การเป็นตัวเองและความกระตือรือร้นของพนักงาน
- การใช้ความสามารถของพนักงานให้เกิดผลสำเร็จ
- การใช้ความคิดสร้างสรรค์ของพนักงานในการบริหารองค์กรให้เกิดผลสำเร็จ
ที่มา : www.td-star.com
CMMS ความก้าวหน้าทางเทคโนโลยีด้านการซ่อมบำรุง
ความก้าวหน้าทางเทคโนโลยีด้านการซ่อมบำรุง
บริษัทฯ ได้นำระบบสารสนเทศสำหรับคอมพิวเตอร์ในการควบคุมกำหนดการบำรุงรักษาเชิงป้องกัน Computerized Maintenance Management System (CMMS) มาใช้กับอุปกรณ์ทุกชนิดควบคู่กันเพื่อให้มั่นใจได้ว่าอุปกรณ์ทุกชนิดสำหรับระบบผลิตและส่งจ่ายน้ำประปาภายในโรงผลิตน้ำประปาบางเลนและสถานีจ่ายน้ำทุกแห่งรวมถึงอุปกรณ์วาล์วทุกชนิดที่ถูกติดตั้งไว้สำหรับท่อประทานจ่ายน้ำ (Bulk Trunk Main, BTM) จากโรงผลิตน้ำประปาบางเลนไปยังสถานีจ่ายน้ำพุทธมณฑลและสถานีจ่ายน้ำมหาชัยและระบบท่อจ่ายน้ำสาขา (Local Distribution Network, LDN) ซึ่งส่งน้ำไปยังเครือข่ายระบบท่อส่งน้ำของการประปาส่วนภูมิภาคสู่ผู้ใช้น้ำนั้นจะได้รับการตรวจสอบหรือปรับปรุงเพื่อการซ่อมบำรุงในเชิงป้องกันได้อย่างตรงเวลา ประกอบด้วยส่วนควบคุมหลักคือ ระบบคอมพิวเตอร์สำหรับการซ่อมบำรุง Computerized Maintenance Management System (CMMS) เพื่อให้การซ่อมบำรุงเป็นไปอย่างมีมาตรฐาน บริษัทฯ ได้นำระบบระบบควบคุมคอมพิวเตอร์มาใช้สำหรับการซ่อมบำรุง, เบิกจ่ายอะไหล่, การสำรองอะไหล่ที่ต้องใช้ในกรณีฉุกเฉิน ซึ่งระบบคอมพิวเตอร์นี้หรือ Computerized Maintenance Management System (CMMS) ซึ่งถูกนำมาใช้สำหรับระบบผลิตและส่งจ่ายน้ำประปานี้ได้เลือกใช้ซอฟแวร์ของ MAXIMO
MAXIMO เป็นโปรแกรมการจัดการที่มีประสิทธิภาพสูงสามารถรองรับการซ่อมบำรุงด้วยอุปกรณ์อะไหล่จำนวนมากๆ พร้อมทำการเชื่อมต่อกับระบบการออกใบสั่งซื้อและข้อมูลการสำรองอะไหล่ได้อย่างมีประสิทธิภาพจึงเป็นโปรแกรมที่ได้ถูกเลือกนำมาใช้สำหรับระบบซ่อมบำรุงของบริษัทฯ ซึ่งจะต้องมีการเชื่อมต่อและแจ้งเตือนสถานะข้อมูลของอะไหล่จำนวนมากและยังมีการเชื่อมต่อกับระบบการจัดซื้ออะไหล่เพื่อสำรอง ซึ่งทำให้สามารถทราบถึงสถานะของอะไหล่ การเบิกจ่ายและอะไหล่ที่อยู่ระหว่างการสั่งซื้อ นอกจากจะทำให้เครื่องจักรได้รับการบำรุงรักษาได้อย่างตรงเวลาและสม่ำเสมอแล้วประสิทธิภาพของการจัดการด้วยระบบคอมพิวเตอร์คือ ฐานข้อมูลประวัติการซ่อมแซมที่สามารถจะถูกนำออกมาเรียกดูได้ตลอดเวลาเพื่อประโยชน์ในการวิเคราะห์ผลและประสิทธิภาพการซ่อมบำรุงของเครื่องจักรแต่ละชนิดรวมถึงการปรับปรุงระบบได้อย่างมีประสิทธิภาพต่อไป
RESOURCE: http://www.thaitap.com/th/06_technology/02_article.php?TechnologyProgressID=3
MAXIMO Implementation Services
Implementing MAXIMO, whether it is MAXIMO 4x, MAXIMO 5x, or MAXIMO 6x, involves much more than installing software, loading a database, and taking a few classes. As an advanced EAM system, MAXIMO is integrated into your business and configured to match your maintenance management requirements. Often times, MAXIMO shares data and works closely with other enterprise systems. Current processes may be re-engineered to reflect best practices. Legacy applications and hardware have to be considered. MMSI's Implementation Services provide you with the highest level of technical knowledge, industry expertise, tools, and training. Our professionals have in-depth, working knowledge of MAXIMO and understand fully the challenges and solutions for a successful implementation. While each MAXIMO implementation project is tailored to our clients' needs, our methodology revolves around the following implementation phases:
PHASE I: PROJECT INTEGRATION
This phase sets the foundation for the project by refining the scope of work and client business objectives, establishing the technical environment in which MAXIMO will operate, and providing product education for the core project team. The major tasks in this phase are: (1) project organization and core team assembly, (2) technical environment and infrastructure planning, (3) hardware and software installation and tuning, (4) core team product orientation and training, and (5) preparation of a detailed implementation plan.
PHASE II: SITE ASSESSMENT
The objective of this phase is to engender an understanding of your business requirements and to map those requirements to MAXIMO. This involves a review of current business practices, procedures, and information data flows for the functional areas that MAXIMO will impact. Using a technique called Gap Analysis, the implementation team identifies the gaps that exist between your business processes and MAXIMO. The results are used to determine which components of MAXIMO will be tailored to support those gaps.
PHASE III: SOP/WORKFLOW DESIGN
In a series of workshop settings, standard operating procedures (SOPs) and workflow processes are designed and documented. Once developed, each procedure is mapped to a series of MAXIMO system functions such as work requests, work orders, or purchase orders. The end result is a set of SOPs that serve as detailed instructions for using MAXIMO as well as training guides for end-users.
PHASE IV: CONFIGURATION
Based on the results of the first three phases, the core MAXIMO applications are configured and customized to meet your requirements. Activities include but are not limited to screen customization, database reconfiguration, custom application deployment, building data validation rules and lists, enabling system and user defaults, and establishing security parameters. Also included is the development and implementation of operational, management, and metric reports using such tools as Actuate, Crystal Reports, and SQR.
PHASE V: DATA TRANSFORMATION
MMSI consultants work with every client to determine which assets, spare parts, and PM routines should be included and stored in MAXIMO, what the best data collection methodology is, how the information will be structured in the MAXIMO database, and how it will be entered. If data is to be manually collected and entered, MMSI will develop customized data collection forms and oversee the data collection process. Should data exist in legacy systems, MMSI's data specialists possess the knowledge and experience to map and convert that data in the shortest amount of time using customized legacy data extraction and upload tools.
PHASE VI :INTEGRATION
MMSI integration consultants can help you extend the value of MAXIMO by connecting it to your other enterprise applications and to your day-to-day operational systems (e.g., time-keeping, project planning and control, etc.). Using such tools as the MAXIMO Enterprise Adapter (MEA), MAXIMO's MIG Data Xchange, and more, MMSI technicians can help you to seamlessly integrate MAXIMO with such applications as PeopleSoft, Oracle Financials, and SAP. Our consultants can also develop custom interfaces to important applications in your organization.
PHASE VII: TRAINING
MMSI offers training and education tailored precisely to your enterprise and to individual user-communities within the organization. In addition to the standard training offered for each component of MAXIMO, we provide one-on-one support as you begin your deployment, teaching your staff how to use MAXIMO on the job. We also offer customized training in system administration, report design, and in system integration techniques. Click here to learn more about MMSI's Training and Education programs.
PHASE VIII :STARTUP
The startup phase includes all of the tasks associated with moving from design, development, and testing to full production use of MAXIMO. During this phase MMSI creates the production database, double-checks that all necessary client infrastructure is in place, ensures that all new users are properly profiled to access the system, and implements the bridges to other enterprise applications. Where required, an MMSI team remains on-site throughout the first week of Startup to handle any questions that may emerge.
RESOURCE: http://www.mmgts.com/services/implementation/maximo.htm
บริษัทฯ ได้นำระบบสารสนเทศสำหรับคอมพิวเตอร์ในการควบคุมกำหนดการบำรุงรักษาเชิงป้องกัน Computerized Maintenance Management System (CMMS) มาใช้กับอุปกรณ์ทุกชนิดควบคู่กันเพื่อให้มั่นใจได้ว่าอุปกรณ์ทุกชนิดสำหรับระบบผลิตและส่งจ่ายน้ำประปาภายในโรงผลิตน้ำประปาบางเลนและสถานีจ่ายน้ำทุกแห่งรวมถึงอุปกรณ์วาล์วทุกชนิดที่ถูกติดตั้งไว้สำหรับท่อประทานจ่ายน้ำ (Bulk Trunk Main, BTM) จากโรงผลิตน้ำประปาบางเลนไปยังสถานีจ่ายน้ำพุทธมณฑลและสถานีจ่ายน้ำมหาชัยและระบบท่อจ่ายน้ำสาขา (Local Distribution Network, LDN) ซึ่งส่งน้ำไปยังเครือข่ายระบบท่อส่งน้ำของการประปาส่วนภูมิภาคสู่ผู้ใช้น้ำนั้นจะได้รับการตรวจสอบหรือปรับปรุงเพื่อการซ่อมบำรุงในเชิงป้องกันได้อย่างตรงเวลา ประกอบด้วยส่วนควบคุมหลักคือ ระบบคอมพิวเตอร์สำหรับการซ่อมบำรุง Computerized Maintenance Management System (CMMS) เพื่อให้การซ่อมบำรุงเป็นไปอย่างมีมาตรฐาน บริษัทฯ ได้นำระบบระบบควบคุมคอมพิวเตอร์มาใช้สำหรับการซ่อมบำรุง, เบิกจ่ายอะไหล่, การสำรองอะไหล่ที่ต้องใช้ในกรณีฉุกเฉิน ซึ่งระบบคอมพิวเตอร์นี้หรือ Computerized Maintenance Management System (CMMS) ซึ่งถูกนำมาใช้สำหรับระบบผลิตและส่งจ่ายน้ำประปานี้ได้เลือกใช้ซอฟแวร์ของ MAXIMO
MAXIMO เป็นโปรแกรมการจัดการที่มีประสิทธิภาพสูงสามารถรองรับการซ่อมบำรุงด้วยอุปกรณ์อะไหล่จำนวนมากๆ พร้อมทำการเชื่อมต่อกับระบบการออกใบสั่งซื้อและข้อมูลการสำรองอะไหล่ได้อย่างมีประสิทธิภาพจึงเป็นโปรแกรมที่ได้ถูกเลือกนำมาใช้สำหรับระบบซ่อมบำรุงของบริษัทฯ ซึ่งจะต้องมีการเชื่อมต่อและแจ้งเตือนสถานะข้อมูลของอะไหล่จำนวนมากและยังมีการเชื่อมต่อกับระบบการจัดซื้ออะไหล่เพื่อสำรอง ซึ่งทำให้สามารถทราบถึงสถานะของอะไหล่ การเบิกจ่ายและอะไหล่ที่อยู่ระหว่างการสั่งซื้อ นอกจากจะทำให้เครื่องจักรได้รับการบำรุงรักษาได้อย่างตรงเวลาและสม่ำเสมอแล้วประสิทธิภาพของการจัดการด้วยระบบคอมพิวเตอร์คือ ฐานข้อมูลประวัติการซ่อมแซมที่สามารถจะถูกนำออกมาเรียกดูได้ตลอดเวลาเพื่อประโยชน์ในการวิเคราะห์ผลและประสิทธิภาพการซ่อมบำรุงของเครื่องจักรแต่ละชนิดรวมถึงการปรับปรุงระบบได้อย่างมีประสิทธิภาพต่อไป
RESOURCE: http://www.thaitap.com/th/06_technology/02_article.php?TechnologyProgressID=3
MAXIMO Implementation Services
Implementing MAXIMO, whether it is MAXIMO 4x, MAXIMO 5x, or MAXIMO 6x, involves much more than installing software, loading a database, and taking a few classes. As an advanced EAM system, MAXIMO is integrated into your business and configured to match your maintenance management requirements. Often times, MAXIMO shares data and works closely with other enterprise systems. Current processes may be re-engineered to reflect best practices. Legacy applications and hardware have to be considered. MMSI's Implementation Services provide you with the highest level of technical knowledge, industry expertise, tools, and training. Our professionals have in-depth, working knowledge of MAXIMO and understand fully the challenges and solutions for a successful implementation. While each MAXIMO implementation project is tailored to our clients' needs, our methodology revolves around the following implementation phases:
PHASE I: PROJECT INTEGRATION
This phase sets the foundation for the project by refining the scope of work and client business objectives, establishing the technical environment in which MAXIMO will operate, and providing product education for the core project team. The major tasks in this phase are: (1) project organization and core team assembly, (2) technical environment and infrastructure planning, (3) hardware and software installation and tuning, (4) core team product orientation and training, and (5) preparation of a detailed implementation plan.
PHASE II: SITE ASSESSMENT
The objective of this phase is to engender an understanding of your business requirements and to map those requirements to MAXIMO. This involves a review of current business practices, procedures, and information data flows for the functional areas that MAXIMO will impact. Using a technique called Gap Analysis, the implementation team identifies the gaps that exist between your business processes and MAXIMO. The results are used to determine which components of MAXIMO will be tailored to support those gaps.
PHASE III: SOP/WORKFLOW DESIGN
In a series of workshop settings, standard operating procedures (SOPs) and workflow processes are designed and documented. Once developed, each procedure is mapped to a series of MAXIMO system functions such as work requests, work orders, or purchase orders. The end result is a set of SOPs that serve as detailed instructions for using MAXIMO as well as training guides for end-users.
PHASE IV: CONFIGURATION
Based on the results of the first three phases, the core MAXIMO applications are configured and customized to meet your requirements. Activities include but are not limited to screen customization, database reconfiguration, custom application deployment, building data validation rules and lists, enabling system and user defaults, and establishing security parameters. Also included is the development and implementation of operational, management, and metric reports using such tools as Actuate, Crystal Reports, and SQR.
PHASE V: DATA TRANSFORMATION
MMSI consultants work with every client to determine which assets, spare parts, and PM routines should be included and stored in MAXIMO, what the best data collection methodology is, how the information will be structured in the MAXIMO database, and how it will be entered. If data is to be manually collected and entered, MMSI will develop customized data collection forms and oversee the data collection process. Should data exist in legacy systems, MMSI's data specialists possess the knowledge and experience to map and convert that data in the shortest amount of time using customized legacy data extraction and upload tools.
PHASE VI :INTEGRATION
MMSI integration consultants can help you extend the value of MAXIMO by connecting it to your other enterprise applications and to your day-to-day operational systems (e.g., time-keeping, project planning and control, etc.). Using such tools as the MAXIMO Enterprise Adapter (MEA), MAXIMO's MIG Data Xchange, and more, MMSI technicians can help you to seamlessly integrate MAXIMO with such applications as PeopleSoft, Oracle Financials, and SAP. Our consultants can also develop custom interfaces to important applications in your organization.
PHASE VII: TRAINING
MMSI offers training and education tailored precisely to your enterprise and to individual user-communities within the organization. In addition to the standard training offered for each component of MAXIMO, we provide one-on-one support as you begin your deployment, teaching your staff how to use MAXIMO on the job. We also offer customized training in system administration, report design, and in system integration techniques. Click here to learn more about MMSI's Training and Education programs.
PHASE VIII :STARTUP
The startup phase includes all of the tasks associated with moving from design, development, and testing to full production use of MAXIMO. During this phase MMSI creates the production database, double-checks that all necessary client infrastructure is in place, ensures that all new users are properly profiled to access the system, and implements the bridges to other enterprise applications. Where required, an MMSI team remains on-site throughout the first week of Startup to handle any questions that may emerge.
RESOURCE: http://www.mmgts.com/services/implementation/maximo.htm
วันจันทร์ที่ 22 กันยายน พ.ศ. 2551
วันอังคารที่ 8 กรกฎาคม พ.ศ. 2551
สมัครสมาชิก:
บทความ (Atom)